reflectionsAuthorHi! I'm Timmy and this page is going to be a blog about all the projects and work I've done in the Computer Modeling & Animations class. |
Categories |
|
This video project was really cool. I liked it a lot because you were able to take it in different directions, but I liked the way I made it the most. I made the beginning an introduction to the race, and then kept the guy's voiceover going while a few of the kids in the race were being introduced or shown. I chose to use crossfade as the transition as that's overall the easiest one that doesn't involve that much movement or change to the video. Then while they were doing the race, I added a speed change to pick up the pace because they weren't going all that fast.
0 Comments
The point of this project was to show my understanding of the 180 rule, and I think I did it right. I did it so the same guy would be on one part, and the same guy would be on the other part. For the knock knock joke it was a little confusing because the joke didn't get completed so I decided to just make him look like he didn't know what he was talking about. So, to add that effect even more, I added crickets because in video's I've seen it makes it seem like an *awkward* moment.
This assignment was cool because there were different stories you could make with the same clips. I chose to make it seem like he was planning on going out somewhere, but instead he decided to just stay inside. I tried to make them flow together more so in the middle I used a lot of regular cuts, but in the beginning I couldn't find a way to make them flow so I just put crossfades.
This my second video made on premiere pro, and it's just a little bit more advanced. I chose the song that fit the theme I was going for the most, and for the theme I chose to make it revolve around the city at night. For a color theme, I think pretty much every clip I chose was about the same color scheme and it wasn't too hard to find stuff. For matching the cuts to the beats I just listened to the audio, but sometimes I had to listen multiple times. I also got all the videos off of pexels.
This was my first premiere pro project, however I've used video editors before. I know how to work keyframes and stuff so instead of just making them still images I added movement and scale keyframes. The theme of this video was blue, I wanted to originally go with the cool blue that was in the city photo but I couldn't find that many photos. I found them on pexels.com. It was a pretty simple task and I accidentally rendered only 1 frame when rendering it the first time, but it was easy to fix.
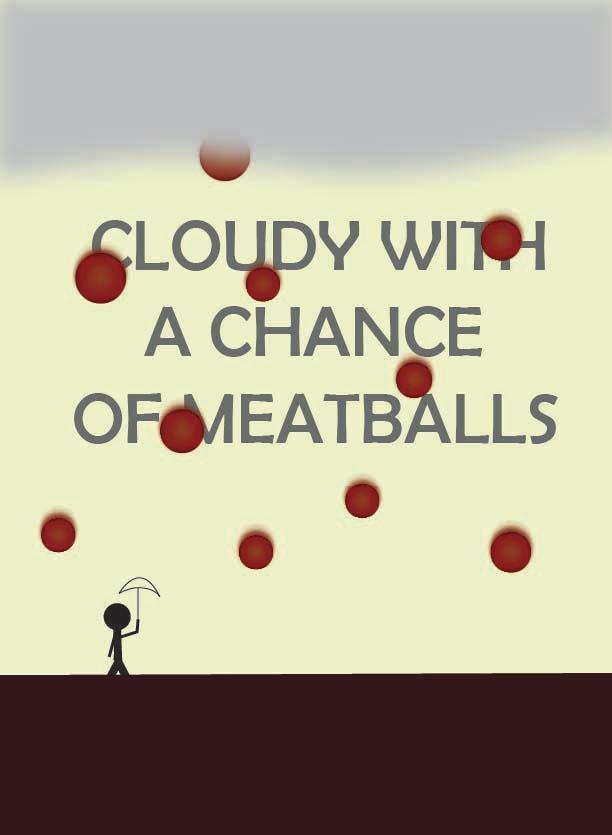 For this movie poster project I focused a lot on shading in the meatballs. Since the name of the movie is cloudy with a chance of meatballs, I tried to get them to add least look rounded and 3d instead of just a flat circle. I didn't have all the time that I needed, but I was able to get most of it done and I liked the character with an umbrella that I had in the bottom of the screen
Over quarter 3 I developed a lot of new skills. I learned how to make a burger and do shading, which was most recent. However at the beginning I learned how to make a simple pizza, and increase in my knowledge in photo design specifically with vectors graphics. Adobe Illustrator was hard to get used to especially from transitioning from photoshop, or for people that have used any other drawing app just because you don't really use the paint and eraser tool much anymore. I think using illustrator combined with any other app, for example After Effects, which I've continued learning more and more since the beginning of the year, would work really well together and I would be able to do cool things with it! Overall I'm excited for 4th quarter since we're getting into video's, and that's not like anything we've done this year.
In this assignment, I used the pen tool to trace logos. It took me a little bit of time to get everything right, but after adjusting and working with the stroke thickness I think I got the traced ones to look pretty good. My biggest problem during this project was making circles, since I had to use the pen tool I wasn't able to use a perfect circle however adjusting the roundness of the points helped make them look almost perfect. I think while doing this I got more accustomed to the pen tool, and it's a little easier to maneuver around the artboard with it. While I don't know if I can make my own art with it yet I do think I've learned how to at least trace. The pen tool is honestly complicated. Getting things exact with it isn't all that easy, however with practice I think I'll be able to get better. One thing that's tricky for me is the forward path, and forgetting to hold alt before making another line, because then the path of the new line gets messed up. However I think this was a good introduction to the pen tool, even though I had prior knowledge I didn't know the tricks to use (holding the ALT key).  For this project, I chose to create the 3 icons that would be specific to audio/visual design kind of stuff. I wanted it to be icons for levels, or like how you did. Level 1 being the headphones, saying you're a beginner, 2 being the camera, saying you're intermediate, and 3 being the movie clappers saying you've kind of completed it and passed, hence the green checkmark. I used shapes for all of these, excluding the arch on the headphones where I used a line tool to get it. I was able to bend the sides of the squares to give it a more/less rounded square effect. |
AuthorWrite something about yourself. No need to be fancy, just an overview. Archives
May 2024
Categories |
 RSS Feed
