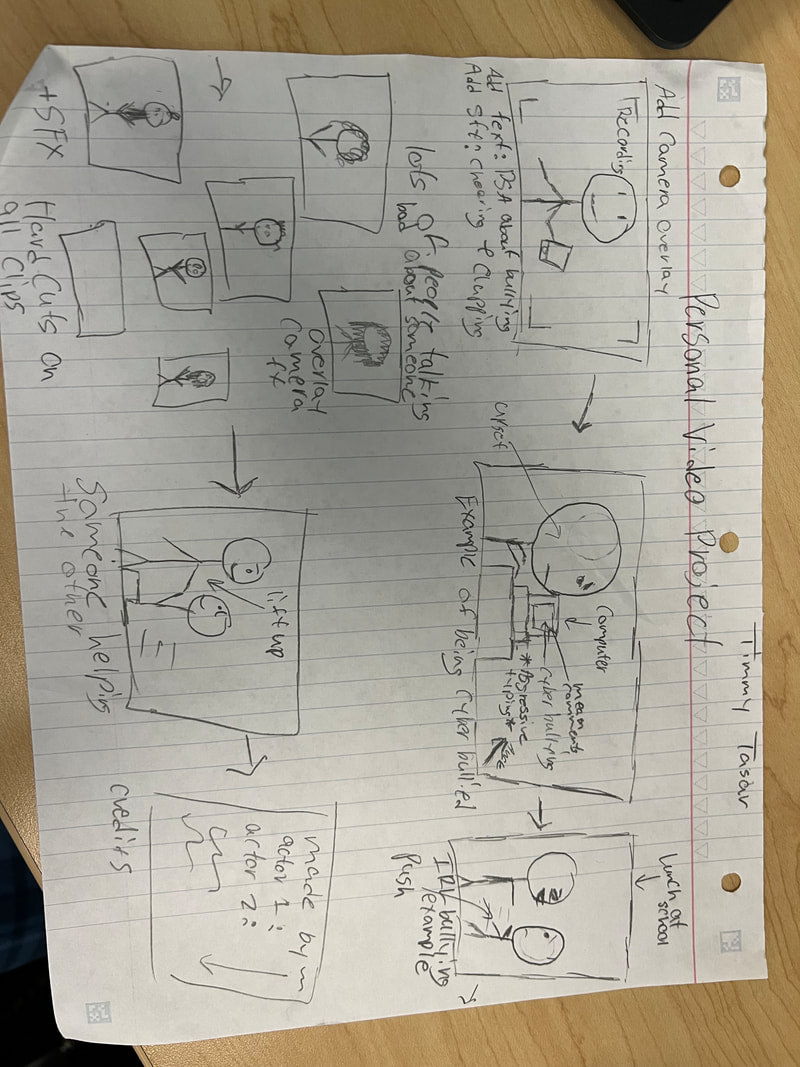
Hi guys, today I am here to talk about bullying [pause while cheer sfx] there are many ways to avoid bullying, or many ways to get bullied and I’ll show you what you can do in this video [cut to me getting bullied online but keep my voice going] [add aggressive typing sfx and then I shut the computer] Then take clips of either me pretending to be different people hating on this girl or I’ll get other people to do Then show a clip of me helping somebody
Then rolling credits -This is like a basic outline of what I'll do for my filming later
Idea for Personal Video Project
PSA about bullying Ask many different people (either at school or me dressed up differently) about if they’ve ever been bullied before. Then ask them if they’ve ever bullied someone before.
This will be a comedic video but I'll also make it about stopping bullying
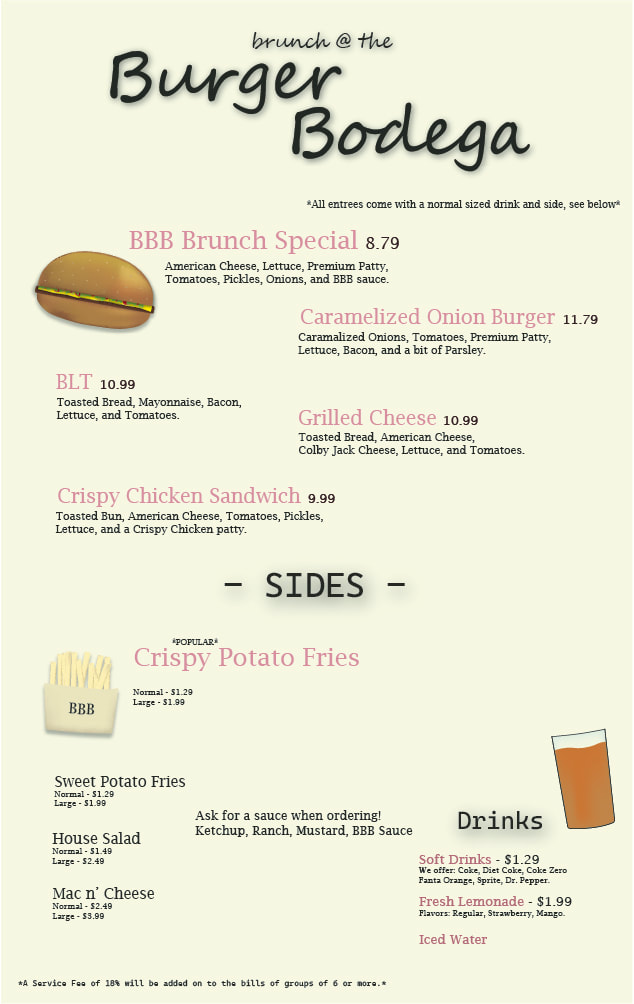
The most time-taking part of this project was getting the burger to look right. While I don't know if it's perfect yet i think I got it pretty good and I'm really proud of the shading on it because I think it looks realistic, and personally I would eat it. I chose the name Breakfast at the Burger Bodega because I think for people, if the letter is repeated it helps them remember the name of it so I thought that would be a unique thing to do and make this a brunch spot, (It would still be open for dinner though). I made the fries hopefully look 3d-ish by using the mesh tool to add a dark shading to the sides of the fry bag, and for the fries themselves I made some spots darker in order to make them look crispy and also make the sides darker for a depth effect. I used 3 different text fonts for the entire menu, and I wanted the split from entrees to sides/drinks to be super obvious so I put dashes around the sides text. I liked this color scheme because it was pleasing to look at combined with the arrangement of text and I also didn't want to create too many menu items so it would be easy to navigate and hopefully just be stuff that people would like or you may find at a typical burger restaurant. I also included an 18% tip at the bottom left so it would look more realistic, and I've seen that before in some restaurants.
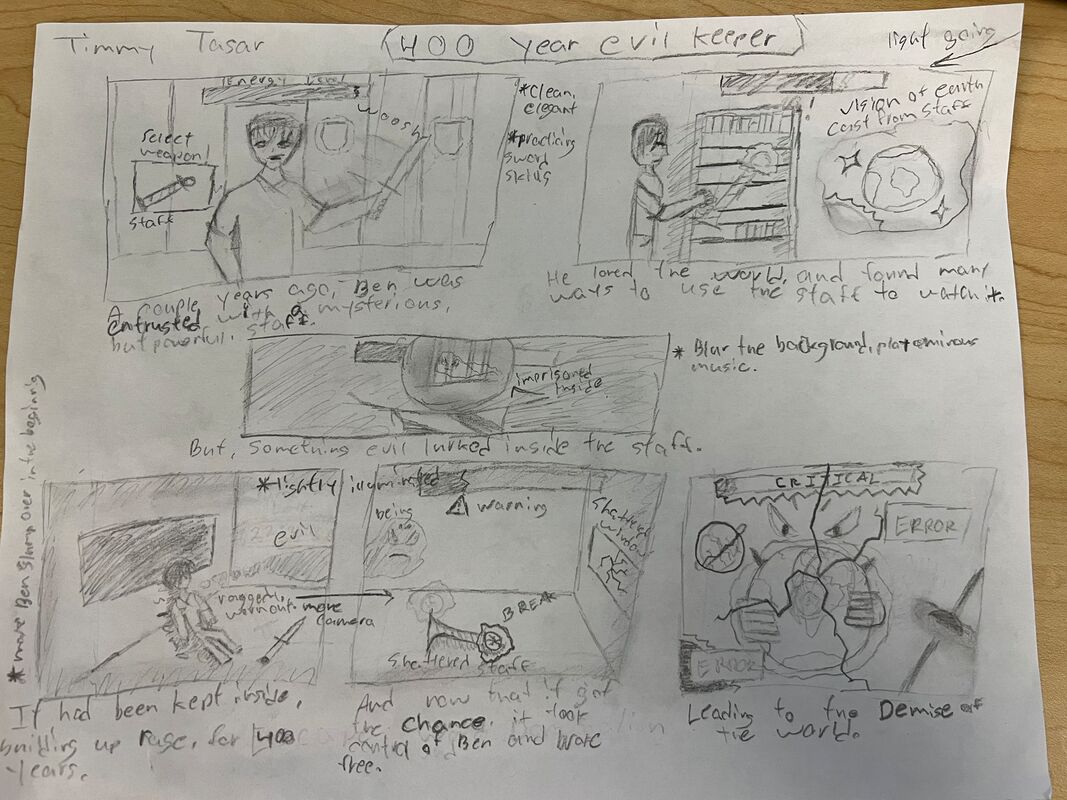
This was a super fun project to do. I wanted to blur things, so I used my finger and smudged some objects to give it more effect. I tried to make shadows where I could for example in box 2, I tried to make the light shine from the projection. In box 4, I wanted it to look illuminated lightly, so I lightly drew pencil scribbles as a border and smudged it. I got to try using my artistic skills and doing something more, I'm not the best artist so I don't draw characters and such, let alone storyboards. I first wanted to make Ben, the character, turn evil in the last slide. However, I then wanted to make more use of the cool staff I drew for him, so I thought it would be cool to make it imprison something. When Ben is shown in the first slide, he's practicing his sword skills. I put the note "clean, elegant" because if it were to be colored, I would want him to look like he's really good at what he's doing and he can do it with ease. Overall this was a fun project that I would definitely do again, and I think the plot is easy to progress through.
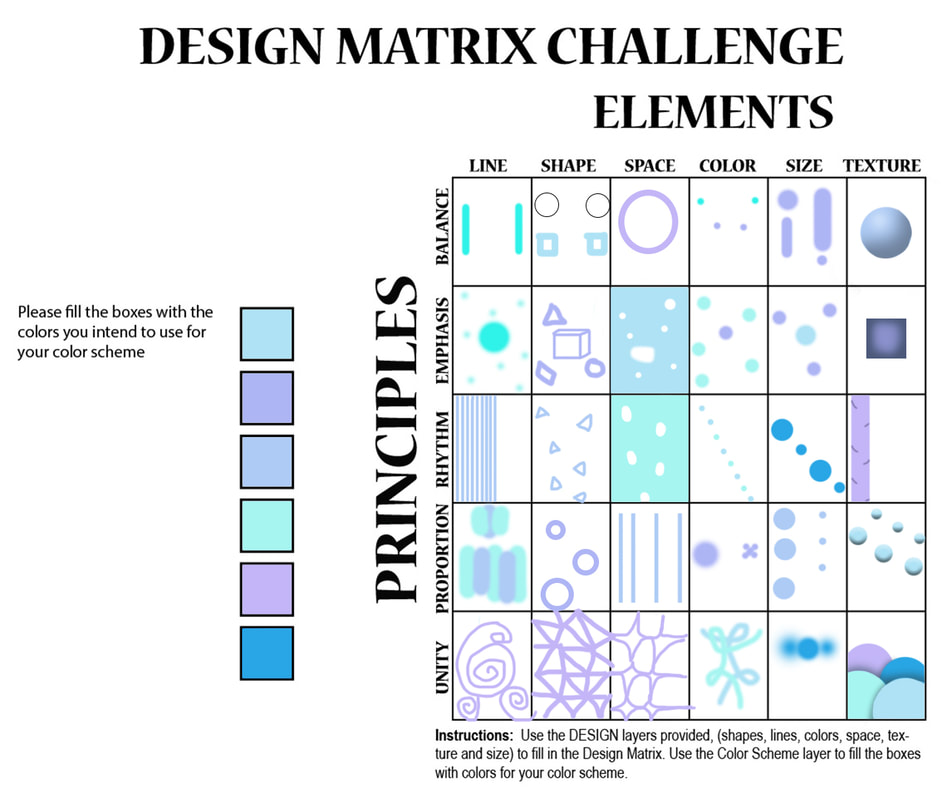
This worksheet wasn't that difficult, but proportion is where I got tripped up the most. In each box I matched the principle to the element, using the paint tool to make what I thought was a good combination. For all the unity ones, I tried to use different objects, lines, and other things to make it look more like one big piece other than many little pieces, and I think overall I did well. For the proportions, I tried to get everything to be similarly spaced out, or look like the same thing except being bigger or having changes. For rhythm, I tried to make the adjustments equally spaced out so it would look good. Emphasis was supposed to have one obvious bigger object, while balance was supposed to be the same on either side.
This was a pretty fun project to do! It took me a really long to do to do the base model, I couldn't really think of any ideas. But then I decided to use the same person, but have like 2 opposites. One sort of really messed up, as if he was lost in the woods or alone on an island, and one being really cool or elegant. To do some basic shading on the clothes, I took the soft brush tool and just turned the transparency lowered on the layer. Then if any of the shading didn't fit within the lines, I just erased the bad looking part. I used a total of 8 different layers for it, and I used each of the layers for separate parts. The shading would go on one layer, the clothes on another, etc. Overall this project was nice, and I think if I did something different like this in the future (or just wanted to draw on my own) I would definitely know what I'm doing more as I learned the different tools I can use to properly color the character.
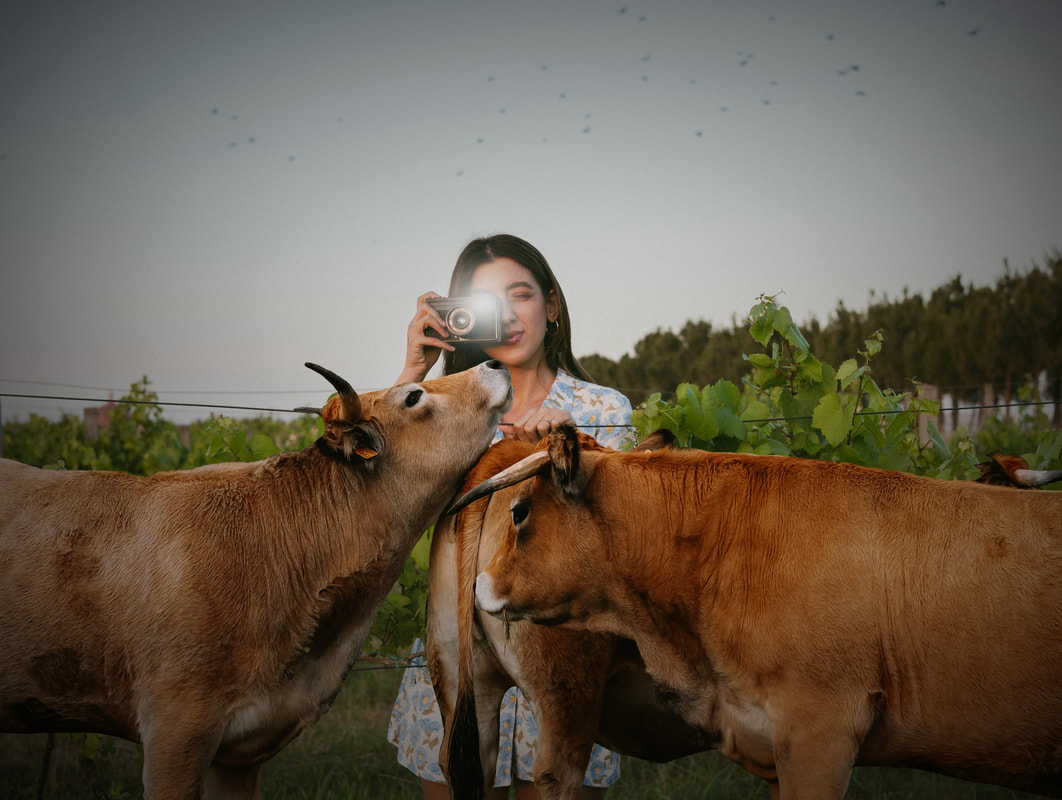
This took me a little while to mask. I had to go around all 3 of the cows, which took me ~1 1/2 class periods. I thought they went well together because it was a nature scene, and what's nature without animals? I added the flash to the camera because I wanted it to really like she was taking a photo of them or something, and then I added a vignette around because I thought it would give the photo more depth with the camera flashing. I wasn't able to use the wand tool and easily mask, I had to manually mask each part. Must be complicated for people who do professional photo editing to mask really complex objects. However, now that I started using non-violent photo editing, I was able to smooth some more stuff out after I was done with all the masking because I could re-add some stuff.
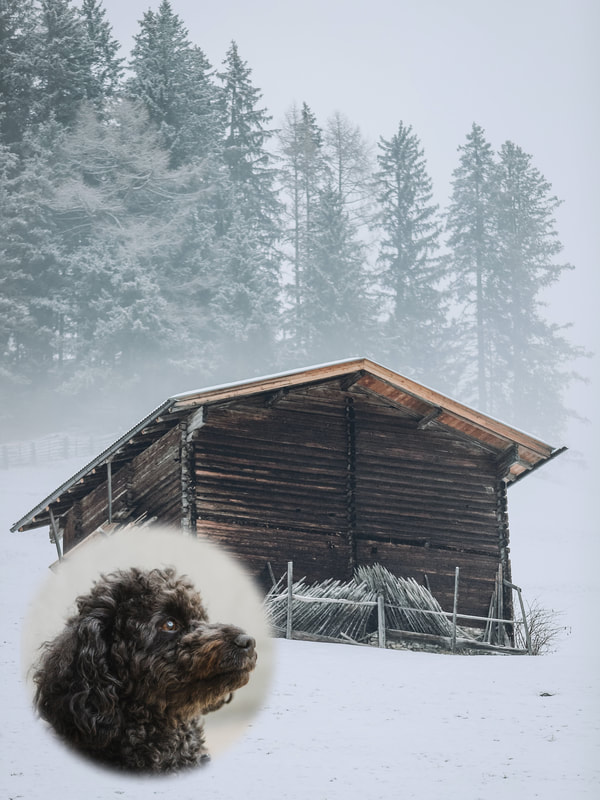
This dog is like me, he likes the winter and the snow. I chose this because personally I would want to stay in a cabin in the middle of winter, I think it would be very cozy. I turned the feather of the elliptical marquee to 5, but all my photos turned to smart photos so I had to convert the dog to a regular layer in order for me to crop it out. This was an easy task to do otherwise.
This PBM took me a little while because I kept adjusting the actual track. However it was a lot easier than it seemed, (I didn't know it was already animated). Before this I didn't know that paths could be used for animating, and I always thought you had to do it manually. I'm a little relieved because if I were to make something in the future, I can just use a path. This was all very new because I never merged a file before, and I also never worked with paths when animating before.
I started this project with the wine glass. It was really confusing because it was something I've never done before, and I ended up having to restart the wine glass. However on my second try it came out looking a lot better and I just needed to make a few adjustments. I liked using the modifiersto make new objects, and I thought tracing over the photo of the chess piece was pretty interesting. I think the easiest part was tracing over the chess piece and then adjusting the line, but making the screw and making a hole with it got a bit confusing, and I had to rewatch the tutorial on parts a few times. I used standard primitives to create the nut and bolt which I'm familiar with already. I now know how to use more modifiers, as well as creating a new object that can move as one by using modifiers and unions. I learned some more parts of 3ds Max, including using the lathe modifier to turn a line into an actual object. I think some instructions especially on the chess piece were a bit confusing just because I wanted to try and make it as perfect as I could, but it ended up fine.
I used keyboard entries for all the primitives inserted on the plane. Because of that I was able to get all the models to look exactly as they should and be 100% precise. I first started with the plane which is basically the floor of the corners, then I used the boxes to make the stones(?) in that corner. Those were the only boxes i used. Then I used cylinders which would be used to be the trunks for the trees, and cones to make them be the top of it. I also used one cylinder to make the entrance of the igloo, and had it rotated. The sphere was used to be main part of the igloo, and then geo spheres to make my little snowman! I used the pyramid tool then to make obviously the pyramids, and had them rotated to fit.